Homemade sourdough bread became quite trendy a few months ago when everyone was in quarantine. When I jumped on the bandwagon I was overwhelmed with information. The whole process seemed so scientific and it even involved math! I had no clue where to begin, and even after I got a healthy starter going, my loaves came out flat and incredibly dense.
I have to admit, I almost gave up. I’m so glad I didn’t! I was fed up not knowing what I was doing wrong, so I ended up dedicating an entire day to deep-diving into the vortex that is the internet sourdough community. I emerged far wiser and fully confident my next loaves would be beautiful. And they were!


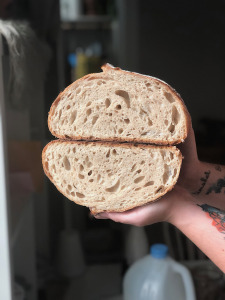
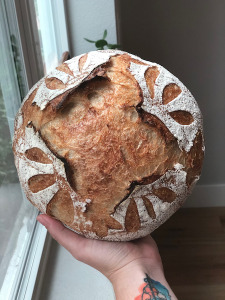
Look at that crumb and oven spring! I was (and honestly still am) SO incredibly proud of this little guy. And honestly, nothing beats a slice of fresh, homemade sourdough slathered with butter. Absolutely nothing.
So if you’re like me — afraid of sourdough, overwhelmed by the science behind it all — keep reading! I’m going to walk you through the process and link you to my favorite helpful resources, so you’ll be making your own gorgeous loaves in no time.

Essential Tools
There are a few products you’ll find invaluable to your sourdough adventures. These are:
Kitchen scale
Dutch oven
Banneton baskets
Bread lame
Bench scraper
I’d recommend investing in all of these for optimal results.
Formula
First you have to get a healthy, active starter going. If you have a friend who’s into sourdough, ask if you can have some of theirs. The awesome thing about sourdough starter is that you never run out of it, as long as you keep feeding it, so it’s super easy to gift to friends!
Making your own starter couldn’t be easier. Just combine equal amounts (by weight!) of flour and water into a glass container — I like using wide-mouth mason jars or Kerr flip-lid jars. Cover it with a towel, cheesecloth, or something similar so some air can filter in and out, and leave it at room temperature.
Keep adding equal amounts of flour and water to your starter every day. Around days 4-6 (depending on the environment of your kitchen), you’ll notice the starter smelling a bit sour, and it’ll look a little bubbly. That’s awesome! That means your starter is just about ready to use. From now on, it will grow every time you feed it, so discard some before every feeding so it doesn’t overflow your container.
View this post on Instagram
Levain
This really confused me at first. Isn’t levain the same as starter? The short answer is yes, they are essentially the same thing. Levain is basically just an offshoot of your starter. I like to make a levain for my bread because it means I can maintain a smaller starter. You can read more about levain and starter in this article.
To make my levain, I just combine 50g of ripe starter with 100g flour and 100g water, which will make enough levain for two good-size loaves. Stir everything together and let it sit at room temperature until it’s active (about 4-8 hours). Your levain is ready to use when it passes the “float test”: drop a small bit of levain in water, and if it floats, you’re ready to start making your dough!
Ingredients
Flour, water, levain, salt. That’s literally it. You’ll get the best results with bread flour (I like King Arthur’s bread flour), but you probably have all these ingredients in your kitchen — remember, levain is just flour and water. No excuses not to bake now, huh?
Baker’s Math
If I’ve mastered this, so can you! Baker’s math is super easy. Basically, whatever amount of flour is in your recipe is always 100%, and the rest of the calculations are based off that.
From there you can figure out the measurements of the other ingredients: water, levain, and salt. Here is a pretty typical sourdough formula:
Flour: 100%
Water: 75%
Levain: 20%
Salt: 2%
Remember, we calculate everything based on the total amount of flour in our recipe. Say we’re using 1000g of flour. Using the formula above, that makes our recipe:
Flour: 1000g
Water: 750g (1000 x .75)
Levain: 200g (1000 x .20)
Salt: 20g (1000 x .02)
Pretty easy, huh? We call this a 75% hydration loaf, because the water is 75% of the flour. That’s really all there is to it. And the fun part is that you can totally play around with this formula once you’re confident in your bread making abilities!
Autolyse
This step is totally optional. I like to do it because it makes it a bit easier to mix the levain into the flour + water mixture, but there have been several times I’ve forgotten and my bread has been just as good.
This step just requires you to mix together the flour and water in a large bowl about 30 min-1 hour before your levain is ready. We do this to kickstart the gluten development of your dough. If you have time, do it, but if you don’t, it’s no big deal.
Bulk Rise
Now we’re going to add that 200g of that super active levain and 20g salt into the dough. I mix these in by hand. It takes a bit of time to get the levain fully incorporated. Once everything is mixed together (it should be pretty sticky!), cover with plastic wrap or a damp cloth and let the dough start to ferment — this is the beginning of the bulk rise.
During this stage we develop the gluten. In a lot of breads this is done by kneading; with sourdough, however, many people prefer the “stretch and fold” method. This is done in 30-minute intervals during the beginning of the bulk rise, until the gluten is developed. Wet your hand first so it doesn’t stick to the dough! Here’s a great video of this process:
Check gluten development using the windowpane test: pinch off a small section of your dough and gently stretch it between your fingers. If it spreads thin enough for you to see light through it without it tearing, the gluten is developed. I cover the bowl and let it sit for 4-8 hours at room temperature, then put it in the fridge overnight.
Shaping
You’ll know your dough is done with the bulk rise when there are visible bubbles on top and it’s about doubled in size. You can also do another float test with the dough if you’re unsure!
Following the bulk rise, gently turn the dough out onto a lightly floured surface. Divide it into two (since this recipe is for two loaves) and form them into rough rounds, using a flour-coated bench scraper to help. If you have some time, let it rest for 20-40 minutes (this is called the bench rest). If you don’t, no worries, just go straight into shaping your dough.
I like to shape my dough into rounds. Spread the dough slightly and fold each of the 4 sides into the middle; then turn it over and use your hands to scoop the sides under, tightening the surface tension of the dough. Once you’ve shaped your loaves, turn them upside down into floured banneton baskets and cover. Here’s a great video that shows how to shape a loaf:
Proof
Your loaves are now proofing. My proofs don’t take long at all (about 1-2 hours); it’s okay if yours take longer. Do the poke test to check your dough: coat a finger in some flour and poke it about 2 inches into your dough. If it springs back right away, the dough is underproofed. If it doesn’t spring back at all, it’s overproofed. If it comes back to you slowly, the loaves are ready to go in the oven!
Scoring and Baking
Preheat a dutch oven in a 450 degree oven for at least 45-60 minutes before you bake your loaves. I put a sheet pan on the rack below my dutch oven to prevent the bottom from getting too hot and burning my loaf. If you didn’t preheat your oven and you’re worried about your loaves over-proofing, stick them in the fridge until the dutch oven is preheated.
When everything is ready to go, turn your dough out onto a large square of parchment paper. Score it with your bread lame. You could make a pattern in the loaf, or just cut one simple line down the loaf; pretty much anything goes here! Here’s a helpful video of the scoring process:
Lower your dough on the parchment paper carefully into your dutch oven. Bake with the lid on for 30 minutes, then take the lid off and bake for another 20-30 minutes or until it’s done to your liking. It should be full, domed, brown, and looking delicious! Lift it carefully out of the dutch oven and transfer it to a cooling rack.
This is the hardest part — you really need to let your bread cool for at least an hour before cutting into it. It’ll lock in all that moist goodness and your loaf will stay fresh for longer. That, or you can just eat the whole thing while it’s hot…I won’t tell!

Was this helpful? Have you baked sourdough before, or are you just starting out? Let us know in the comments!
If You Enjoyed This Handy Beginner’s Guide To Sourdough, You May Also Like:
The Best Breakfast Charcuterie Board Ideas
Incredibly Easy And Cozy Soups And Stews To Feast On This Winter

